Monday, December 8, 2014

CARROT SHEET CAKE


Here's a recipe for a delicious carrot sheet cake:

Carrot Sheet Cake Recipe
Ingredients:
  • 2 cups all-purpose flour
  • 2 cups granulated sugar
  • 1 teaspoon baking powder
  • 1/2 teaspoon baking soda
  • 1/2 teaspoon salt
  • 1 teaspoon ground cinnamon
  • 1/2 teaspoon ground nutmeg
  • 1/2 teaspoon ground ginger
  • 4 large eggs, at room temperature
  • 1 cup vegetable oil
  • 2 cups grated carrots (about 3-4 medium carrots)
  • 1 cup crushed pineapple, drained
  • 1 teaspoon vanilla extract
  • 1 cup chopped walnuts or pecans (optional)

Cream Cheese Frosting:
  • 8 oz cream cheese, softened
  • 1/2 cup unsalted butter, softened
  • 4 cups powdered sugar
  • 1 teaspoon vanilla extract

Instructions:

1. Preheat your oven to 350°F (175°C). Grease and flour a 9x13-inch baking pan or line it with parchment paper.

2. In a large mixing bowl, whisk together the flour, sugar, baking powder, baking soda, salt, cinnamon, nutmeg, and ginger until well combined.

3. In another bowl, beat the eggs lightly. Then, gradually whisk in the vegetable oil and vanilla extract until smooth.

4. Pour the wet ingredients into the dry ingredients and stir until just combined. Do not overmix.

5. Fold in the grated carrots, crushed pineapple, and chopped nuts (if using) until evenly distributed throughout the batter.

6. Pour the batter into the prepared baking pan, spreading it out evenly.

7. Bake in the preheated oven for 30-35 minutes, or until a toothpick inserted into the center comes out clean.

8. Remove the cake from the oven and allow it to cool completely in the pan on a wire rack.

9. While the cake is cooling, prepare the cream cheese frosting. In a large bowl, beat together the softened cream cheese and butter until smooth and creamy.

10. Gradually add in the powdered sugar, one cup at a time, beating well after each addition until smooth and fluffy. Mix in the vanilla extract.

11. Once the cake has cooled completely, spread the cream cheese frosting evenly over the top.

12. Optionally, garnish with additional chopped nuts or shredded carrots.

13. Cut into squares and serve. Enjoy your delicious carrot sheet cake!

This cake is perfect for any occasion and is sure to be a crowd-pleaser with its moist texture and creamy frosting.

CARROT CAKE PANCAKES


Here's a recipe for delicious carrot cake pancakes:

Ingredients:

  • 1 cup all-purpose flour
  • 1 teaspoon baking powder
  • 1/2 teaspoon baking soda
  • 1/4 teaspoon salt
  • 1 teaspoon ground cinnamon
  • 1/4 teaspoon ground nutmeg
  • 1/4 teaspoon ground ginger
  • 1/4 cup brown sugar (packed)
  • 1/2 cup finely grated carrots
  • 1/4 cup crushed pineapple (drained)
  • 1/4 cup chopped walnuts or pecans (optional)
  • 1 large egg
  • 3/4 cup buttermilk (or 3/4 cup milk with 1 tablespoon vinegar or lemon juice, let sit for 5 minutes)
  • 2 tablespoons melted butter or vegetable oil
  • 1 teaspoon vanilla extract
  • Maple syrup, cream cheese glaze, or powdered sugar for serving

Instructions:

1. In a large bowl, whisk together the flour, baking powder, baking soda, salt, cinnamon, nutmeg, and ginger.

2. In another bowl, mix together the brown sugar, grated carrots, crushed pineapple, and chopped nuts (if using).

3. In a separate bowl, whisk together the egg, buttermilk, melted butter or oil, and vanilla extract.

4. Pour the wet ingredients into the dry ingredients and stir until just combined. Be careful not to overmix; a few lumps are okay.

5. Gently fold in the carrot mixture until evenly distributed throughout the batter.

6. Heat a lightly greased skillet or griddle over medium heat. Pour about 1/4 cup of batter onto the skillet for each pancake, spreading it out slightly with the back of a spoon.

7. Cook the pancakes for 2-3 minutes on one side, or until bubbles form on the surface and the edges look set.

8. Flip the pancakes and cook for another 1-2 minutes on the other side, or until golden brown and cooked through.

9. Remove the pancakes from the skillet and keep warm while you cook the remaining batter.

10. Serve the carrot cake pancakes warm with maple syrup, cream cheese glaze, or a dusting of powdered sugar. Enjoy your delicious breakfast treat!

AMAZING BANANA BREAD PANCAKES


Banana bread pancakes are a delightful twist on the classic breakfast treat. Here's a simple recipe for you:

Ingredients:

  • 1 cup all-purpose flour
  • 1 tablespoon granulated sugar
  • 1 teaspoon baking powder
  • 1/2 teaspoon baking soda
  • 1/4 teaspoon salt
  • 1/2 teaspoon ground cinnamon (optional)
  • 1 ripe banana, mashed
  • 1 large egg
  • 1 cup buttermilk (or substitute with regular milk)
  • 1 tablespoon melted butter or vegetable oil
  • 1 teaspoon vanilla extract
  • Optional toppings: sliced bananas, chopped nuts, maple syrup

Instructions:

1. Prepare the Batter:

  • In a large mixing bowl, combine the flour, sugar, baking powder, baking soda, salt, and cinnamon (if using). Mix well.
  • In another bowl, mash the ripe banana using a fork until smooth.
  • Add the egg, buttermilk, melted butter or oil, and vanilla extract to the mashed banana. Whisk until thoroughly combined.

2. Combine Wet and Dry Ingredients:

  • Pour the wet ingredients into the dry ingredients. Stir until just combined. It's okay if the batter is slightly lumpy.
  • If the batter seems too thick, you can add a splash more buttermilk to reach your desired consistency. Be careful not to overmix, as this can result in tough pancakes.

3. Cook the Pancakes:

  • Heat a non-stick skillet or griddle over medium heat. Lightly grease the surface with butter or cooking spray.
  • Once the skillet is hot, pour about 1/4 cup of batter onto the skillet for each pancake. Use the back of a spoon or ladle to spread the batter into a circular shape if needed.
  • Cook until bubbles form on the surface of the pancake and the edges start to look set, about 2-3 minutes.
  • Carefully flip the pancakes using a spatula and cook for an additional 1-2 minutes, or until golden brown and cooked through.
  • Repeat with the remaining batter, greasing the skillet as needed between batches.

4. Serve and Enjoy:

  • Serve the banana bread pancakes warm with your favorite toppings, such as sliced bananas, chopped nuts, or a drizzle of maple syrup.
  • Enjoy your delicious and fluffy banana bread pancakes!

These pancakes are perfect for a leisurely weekend breakfast or brunch. Feel free to customize them with your favorite add-ins or toppings for a unique twist!

NUTELLA BANANA BREAD


Nutella banana bread is a delicious twist on the classic banana bread recipe, adding the irresistible flavor of Nutella. Here's a simple recipe for you:

Ingredients:

  • 2-3 ripe bananas, mashed
  • 1/2 cup Nutella (or more, if desired)
  • 1/3 cup melted butter or vegetable oil
  • 1/2 cup granulated sugar
  • 1 large egg, beaten
  • 1 teaspoon vanilla extract
  • 1 1/2 cups all-purpose flour
  • 1 teaspoon baking soda
  • 1/2 teaspoon salt
  • Optional: chopped nuts (such as walnuts or pecans) for extra crunch

Instructions:

1. Preheat the oven: Preheat your oven to 350°F (175°C). Grease a 9x5-inch loaf pan or line it with parchment paper.

2. Mix wet ingredients: In a large mixing bowl, combine the mashed bananas, melted butter or oil, beaten egg, granulated sugar, and vanilla extract. Stir until well combined.

3. Add dry ingredients: Sift in the all-purpose flour, baking soda, and salt into the wet ingredients mixture. Gently fold the dry ingredients into the wet until just combined. Be careful not to overmix, as this can make the bread dense.

4. Add Nutella swirl: Pour half of the banana bread batter into the prepared loaf pan. Dollop spoonfuls of Nutella over the batter. Use a knife or skewer to gently swirl the Nutella into the batter. Be careful not to overmix; you want distinct swirls of Nutella throughout the bread.

5. Add nuts (optional): If you're using chopped nuts, sprinkle them evenly over the Nutella swirl.

6. Top with remaining batter: Pour the remaining banana bread batter over the Nutella swirl and smooth the top with a spatula.

7. Bake: Place the loaf pan in the preheated oven and bake for 50-60 minutes, or until a toothpick inserted into the center of the bread comes out clean or with a few moist crumbs.

8. Cool and serve: Once baked, remove the banana bread from the oven and let it cool in the pan for about 10-15 minutes. Then, transfer it to a wire rack to cool completely before slicing. Enjoy your delicious Nutella banana bread warm or at room temperature!

This Nutella banana bread is perfect for breakfast, brunch, or as a sweet treat any time of the day. Feel free to customize it by adding chocolate chips, shredded coconut, or other mix-ins of your choice!

NUTELLA BANANA OAT MUFFINS


Nutella banana oat muffins are a delightful treat that combines the rich flavor of Nutella with the sweetness of bananas and the heartiness of oats. Here's a simple recipe for you:

Ingredients:

  • 1 cup all-purpose flour
  • 1 cup rolled oats
  • 1/2 cup brown sugar
  • 1 teaspoon baking powder
  • 1/2 teaspoon baking soda
  • 1/4 teaspoon salt
  • 2 ripe bananas, mashed
  • 1/2 cup Nutella (or any hazelnut chocolate spread)
  • 1/4 cup vegetable oil
  • 1/4 cup milk (dairy or plant-based)
  • 1 large egg
  • 1 teaspoon vanilla extract
  • Optional: chopped nuts or chocolate chips for topping

Instructions:

1. Preheat your oven to 350°F (175°C). Line a muffin tin with paper liners or grease the cups lightly with cooking spray.

2. In a large mixing bowl, combine the flour, rolled oats, brown sugar, baking powder, baking soda, and salt. Stir until well combined.

3. In another bowl, mash the bananas using a fork until smooth. Add the Nutella, vegetable oil, milk, egg, and vanilla extract. Mix until everything is well incorporated.

4. Pour the wet ingredients into the dry ingredients. Gently fold the mixture together using a spatula or wooden spoon until just combined. Be careful not to overmix, as this can result in tough muffins.

5. Spoon the batter into the prepared muffin cups, filling each about 3/4 full. If desired, sprinkle some chopped nuts or chocolate chips on top of each muffin for added flavor and texture.

6. Bake in the preheated oven for 18-20 minutes, or until a toothpick inserted into the center of a muffin comes out clean.

7. Remove the muffin tin from the oven and let the muffins cool in the tin for a few minutes before transferring them to a wire rack to cool completely.

8. Once cooled, serve and enjoy your delicious Nutella banana oat muffins! They can be stored in an airtight container at room temperature for up to 3 days, or in the refrigerator for longer freshness. Enjoy with a glass of milk or your favorite hot beverage.

THE BEST BANANA BREAD


Here's a recipe for delicious banana bread:

Ingredients:

  • 3 ripe bananas, mashed
  • 1/3 cup melted butter
  • 1 teaspoon baking soda
  • Pinch of salt
  • 3/4 cup granulated sugar
  • 1 large egg, beaten
  • 1 teaspoon vanilla extract
  • 1 1/2 cups all-purpose flour

Optional Add-ins:

  • 1/2 cup chopped nuts (such as walnuts or pecans)
  • 1/2 cup chocolate chips
  • 1/2 teaspoon cinnamon

Instructions:

1. Preheat your oven to 350°F (175°C). Grease a 9x5-inch loaf pan or line it with parchment paper.

2. In a mixing bowl, mash the ripe bananas with a fork or potato masher until smooth.

3. Stir the melted butter into the mashed bananas.

4. Add the baking soda and salt to the mixture and stir well.

5. Stir in the sugar, beaten egg, and vanilla extract until well combined.

6. Gradually add the flour to the banana mixture, stirring until just combined. Be careful not to overmix, as this can lead to a dense banana bread.

7. If using any optional add-ins such as chopped nuts, chocolate chips, or cinnamon, gently fold them into the batter.

8. Pour the batter into the prepared loaf pan, spreading it out evenly.

9. Bake in the preheated oven for 50-60 minutes, or until a toothpick inserted into the center comes out clean.

10. Allow the banana bread to cool in the pan for about 10 minutes, then transfer it to a wire rack to cool completely before slicing and serving.


Enjoy your freshly baked banana bread! It's perfect for breakfast, as a snack, or even as dessert.

Starbucks Banana Bread Recipe


Here's a recipe for Starbucks-style banana bread that you can try at home:

Ingredients:

  • 2 cups all-purpose flour
  • 1 teaspoon baking soda
  • 1/4 teaspoon salt
  • 1/2 cup unsalted butter, softened
  • 1 cup granulated sugar
  • 2 large eggs
  • 1 1/2 cups mashed ripe bananas (about 3 medium bananas)
  • 1/4 cup sour cream or Greek yogurt
  • 1 teaspoon vanilla extract
  • 1/2 cup chopped walnuts or pecans (optional)

Instructions:

1. Preheat your oven to 350°F (175°C). Grease a 9x5-inch loaf pan or line it with parchment paper.

2. In a medium bowl, whisk together the flour, baking soda, and salt. Set aside.

3. In a large mixing bowl, cream together the softened butter and sugar until light and fluffy, using a hand mixer or stand mixer.

4. Add the eggs, one at a time, mixing well after each addition.

5. Stir in the mashed bananas, sour cream or Greek yogurt, and vanilla extract until well combined.

6. Gradually add the dry ingredients to the wet ingredients, mixing until just combined. Be careful not to overmix.

7. If using, fold in the chopped nuts until evenly distributed throughout the batter.

8. Pour the batter into the prepared loaf pan, spreading it evenly.

9. Bake in the preheated oven for 60-70 minutes, or until a toothpick inserted into the center comes out clean or with a few moist crumbs.

10. Allow the banana bread to cool in the pan for about 10 minutes, then transfer it to a wire rack to cool completely before slicing and serving.

Enjoy your homemade Starbucks-style banana bread! You can store any leftovers in an airtight container at room temperature for up to several days, or freeze for longer storage.

Salisbury Steak


Salisbury steak is a classic comfort food dish that's hearty and delicious. Here's a recipe you can try:

Salisbury Steak Recipe

Ingredients:

  • 1 pound ground beef (preferably 80/20)
  • 1/2 cup breadcrumbs
  • 1/4 cup finely chopped onion
  • 1 large egg
  • 2 cloves garlic, minced
  • 1 tablespoon Worcestershire sauce
  • 1 teaspoon Dijon mustard
  • Salt and pepper to taste
  • 2 tablespoons olive oil
  • 1 onion, thinly sliced
  • 2 cups beef broth
  • 2 tablespoons all-purpose flour
  • 1 tablespoon tomato paste
  • 1 teaspoon soy sauce
  • Fresh parsley for garnish (optional)

Instructions:

1. In a large mixing bowl, combine the ground beef, breadcrumbs, finely chopped onion, egg, minced garlic, Worcestershire sauce, Dijon mustard, salt, and pepper. Mix until well combined.

2. Divide the mixture into 4 equal portions and shape them into oval patties, about 1/2 inch thick.

3. Heat olive oil in a large skillet over medium-high heat. Once hot, add the patties and cook until browned on both sides, about 4-5 minutes per side. Remove the patties from the skillet and set aside.

4. In the same skillet, add the sliced onion and cook until softened, about 3-4 minutes.

5. Sprinkle the flour over the onions and stir to coat. Cook for another 1-2 minutes to cook off the raw flour taste.

6. Gradually pour in the beef broth while stirring continuously to avoid lumps. Stir in the tomato paste and soy sauce.

7. Return the Salisbury steak patties to the skillet, nestling them into the gravy. Reduce the heat to low, cover, and simmer for 10-15 minutes, or until the patties are cooked through and the gravy has thickened.

8. Once done, remove the Salisbury steaks from the skillet and place them on a serving platter. Spoon the gravy over the patties and garnish with fresh parsley if desired.

9. Serve the Salisbury steak hot with mashed potatoes, rice, or noodles, and your favorite vegetables on the side.


Enjoy your homemade Salisbury steak!


Lemon Bar Cookie Cups


Lemon Bar Cookie Cups Recipe:

Ingredients:

For the Cookie Cups:

  • 1 cup unsalted butter, softened
  • 1/2 cup granulated sugar
  • 2 cups all-purpose flour
  • 1/4 teaspoon salt

For the Lemon Filling:

  • 1 cup granulated sugar
  • 3 large eggs
  • 1/2 cup freshly squeezed lemon juice
  • Zest of 2 lemons
  • 1/4 cup all-purpose flour
  • Powdered sugar, for dusting (optional)

Instructions:

  1. Preheat your oven to 350°F (175°C). Grease a 12-cup muffin tin with non-stick cooking spray or line with cupcake liners.
  2. In a large mixing bowl, cream together the softened butter and granulated sugar until light and fluffy.
  3. Gradually add the flour and salt to the butter mixture, mixing until well combined and a dough forms.
  4. Divide the dough evenly into 12 portions. Press each portion of dough into the bottom and up the sides of the prepared muffin cups, forming a small well in the center.
  5. Bake the cookie cups in the preheated oven for 12-15 minutes, or until the edges are lightly golden. Remove from the oven and allow them to cool slightly.
  6. While the cookie cups are cooling, prepare the lemon filling. In a separate mixing bowl, whisk together the granulated sugar, eggs, lemon juice, lemon zest, and flour until smooth and well combined.
  7. Once the cookie cups have cooled slightly, carefully spoon the lemon filling into each cup, filling them almost to the top.
  8. Return the filled cookie cups to the oven and bake for an additional 15-20 minutes, or until the filling is set and the edges are golden brown.
  9. Remove the lemon bar cookie cups from the oven and allow them to cool completely in the muffin tin.
  10. Once cooled, gently remove the cookie cups from the muffin tin and transfer them to a serving platter. Dust with powdered sugar if desired.
  11. Serve the lemon bar cookie cups at room temperature, and enjoy!

These lemon bar cookie cups are perfect for any occasion, whether you're hosting a party or simply craving a sweet and tangy treat. Enjoy!

Lemon Cream Cookies


Lemon cream cookies are a delightful treat, perfect for any occasion. Here's a recipe to make them:

Ingredients:

  • 1 cup unsalted butter, softened
  • 1 cup granulated sugar
  • Zest of 2 lemons
  • 2 tablespoons fresh lemon juice
  • 2 large eggs
  • 1 teaspoon vanilla extract
  • 3 cups all-purpose flour
  • 1 teaspoon baking powder
  • 1/2 teaspoon salt
  • Powdered sugar for dusting
  • Lemon Cream Filling:
  • 1/2 cup unsalted butter, softened
  • 2 cups powdered sugar
  • Zest of 1 lemon
  • 3-4 tablespoons fresh lemon juice

Instructions:

Lemon Cream Filling:
  1. In a medium bowl, beat the softened butter until creamy using a hand mixer or stand mixer.
  2. Gradually add the powdered sugar, lemon zest, and lemon juice. Beat until smooth and creamy. Adjust the consistency by adding more lemon juice if needed. Set aside.

Lemon Cream Cookies:
  1. Preheat your oven to 350°F (175°C). Line baking sheets with parchment paper or silicone baking mats.
  2. In a large mixing bowl, cream together the softened butter, granulated sugar, and lemon zest until light and fluffy.
  3. Add the lemon juice, eggs, and vanilla extract. Beat until well combined.
  4. In a separate bowl, whisk together the flour, baking powder, and salt.
  5. Gradually add the dry ingredients to the wet ingredients, mixing until a smooth dough forms.
  6. Using a cookie scoop or tablespoon, scoop out dough and roll into balls. Place them on the prepared baking sheets, leaving some space between each cookie.
  7. Use your thumb or the back of a spoon to make an indentation in the center of each cookie.
  8. Bake in the preheated oven for 10-12 minutes or until the edges are lightly golden.
  9. Remove from the oven and allow the cookies to cool on the baking sheets for a few minutes before transferring them to a wire rack to cool completely.

Assembly:
  1. Once the cookies have cooled completely, spoon a small amount of lemon cream filling into the indentation of each cookie.
  2. Dust the filled cookies with powdered sugar for a decorative touch.
  3. Serve and enjoy your delicious lemon cream cookies!

These cookies are tangy, sweet, and wonderfully aromatic, making them a perfect treat for lemon lovers!

Pink Lemonade Cupcakes


Here's a recipe for delicious pink lemonade cupcakes:

Ingredients:

For the cupcakes:
  • 1 and 1/2 cups all-purpose flour
  • 1 and 1/2 teaspoons baking powder
  • 1/4 teaspoon salt
  • 1/2 cup unsalted butter, softened
  • 3/4 cup granulated sugar
  • 2 large eggs
  • 1 teaspoon vanilla extract
  • 1/2 cup buttermilk
  • Zest of 1 lemon
  • 2 tablespoons freshly squeezed lemon juice
  • 1/4 cup pink lemonade concentrate (thawed if frozen)
  • Pink food coloring (optional)

For the frosting:
  • 1/2 cup unsalted butter, softened
  • 2 cups powdered sugar
  • 2-3 tablespoons pink lemonade concentrate
  • 1-2 drops pink food coloring (optional)
  • Lemon zest and slices for garnish (optional)

Instructions:

  1. Preheat your oven to 350°F (175°C) and line a muffin tin with cupcake liners.
  2. In a medium-sized bowl, whisk together the flour, baking powder, and salt. Set aside.
  3. In a large mixing bowl, cream together the softened butter and granulated sugar until light and fluffy.
  4. Beat in the eggs, one at a time, then add the vanilla extract.
  5. Gradually add the dry ingredients to the wet ingredients, alternating with the buttermilk, beginning and ending with the dry ingredients. Mix until just combined.
  6. Add the lemon zest, lemon juice, and pink lemonade concentrate to the batter, mixing until fully incorporated. If desired, add a few drops of pink food coloring to achieve the desired shade.
  7. Spoon the batter into the prepared cupcake liners, filling each about 2/3 full.
  8. Bake in the preheated oven for 18-20 minutes, or until a toothpick inserted into the center comes out clean.
  9. Remove the cupcakes from the oven and allow them to cool in the pan for a few minutes before transferring them to a wire rack to cool completely.
  10. While the cupcakes are cooling, prepare the frosting. In a mixing bowl, beat the softened butter until creamy. Gradually add the powdered sugar, alternating with the pink lemonade concentrate, until the desired consistency is reached. If desired, add a drop or two of pink food coloring for a brighter color.
  11. Once the cupcakes are completely cool, frost them with the pink lemonade frosting using a piping bag or spatula.
  12. Garnish with lemon zest and slices if desired, then serve and enjoy your delightful pink lemonade cupcakes!

These cupcakes are perfect for spring and summer gatherings, birthdays, or any time you're craving a sweet and tangy treat!

Chocolate Cupcakes {Caramel Toffee Frosting}


Here's a recipe for delicious chocolate cupcakes with caramel toffee frosting:

Chocolate Cupcakes:

Ingredients:
  • 1 and 1/3 cups all-purpose flour
  • 1/4 teaspoon baking soda
  • 2 teaspoons baking powder
  • 3/4 cup unsweetened cocoa powder
  • 1/8 teaspoon salt
  • 3 tablespoons unsalted butter, softened
  • 1 and 1/2 cups white sugar
  • 2 eggs
  • 1 teaspoon vanilla extract
  • 1 cup milk

Instructions:
  1. Preheat your oven to 350°F (175°C). Line a muffin tin with cupcake liners.
  2. In a medium-sized bowl, sift together the flour, baking soda, baking powder, cocoa powder, and salt. Set aside.
  3. In a large mixing bowl, cream together the softened butter and sugar until light and fluffy.
  4. Beat in the eggs one at a time, then stir in the vanilla extract.
  5. Gradually mix in the dry ingredients alternately with the milk, starting and ending with the dry ingredients. Mix until just incorporated; do not overmix.
  6. Fill the cupcake liners 2/3 full with batter.
  7. Bake in the preheated oven for 15 to 20 minutes, or until a toothpick inserted into the center of a cupcake comes out clean.
  8. Remove from the oven and let cool completely before frosting.

Caramel Toffee Frosting:

Ingredients:
  • 1 cup unsalted butter, softened
  • 2 cups powdered sugar
  • 1/2 cup caramel sauce (homemade or store-bought)
  • 1/2 cup toffee bits (chopped into small pieces)

Instructions:
  1. In a large mixing bowl, beat the softened butter until creamy and smooth.
  2. Gradually add the powdered sugar, beating until well combined and fluffy.
  3. Mix in the caramel sauce until fully incorporated.
  4. Gently fold in the toffee bits until evenly distributed throughout the frosting.

Assembly:
  1. Once the cupcakes have cooled completely, frost them generously with the caramel toffee frosting using a piping bag or offset spatula.
  2. Optionally, sprinkle some additional toffee bits on top for decoration.
  3. Serve and enjoy your decadent chocolate cupcakes with caramel toffee frosting!

These cupcakes are sure to be a hit at any gathering or celebration. Enjoy baking and indulging in these sweet treats!

Grasshopper Cupcakes


Grasshopper cupcakes are a delightful treat that combines the flavors of mint and chocolate. Here's a recipe to make them:

Ingredients:

For the cupcakes:
  • 1 and 1/2 cups all-purpose flour
  • 3/4 cup granulated sugar
  • 1/2 cup unsweetened cocoa powder
  • 1 teaspoon baking soda
  • 1/2 teaspoon baking powder
  • 1/4 teaspoon salt
  • 2 large eggs, at room temperature
  • 1/2 cup vegetable oil
  • 1 teaspoon vanilla extract
  • 1 cup buttermilk
For the mint buttercream frosting:
  • 1 cup unsalted butter, softened
  • 4 cups powdered sugar
  • 1/4 cup milk
  • 1 teaspoon peppermint extract
  • Green food coloring (optional)
  • Chocolate shavings or sprinkles for decoration (optional)

Instructions:

  1. Preheat the Oven: Preheat your oven to 350°F (175°C). Line a muffin tin with cupcake liners.
  2. Prepare the Cupcake Batter: In a large mixing bowl, whisk together the flour, sugar, cocoa powder, baking soda, baking powder, and salt until well combined.
  3. In a separate bowl, beat the eggs, vegetable oil, and vanilla extract together until smooth. Gradually add the dry ingredients to the wet ingredients, alternating with the buttermilk, beginning and ending with the dry ingredients. Mix until just combined, being careful not to overmix.
  4. Fill the Cupcake Liners: Divide the batter evenly among the cupcake liners, filling each about 2/3 full.
  5. Bake the Cupcakes: Bake in the preheated oven for 18-20 minutes, or until a toothpick inserted into the center of a cupcake comes out clean. Remove from the oven and allow the cupcakes to cool in the pan for a few minutes before transferring them to a wire rack to cool completely.
  6. Make the Mint Buttercream Frosting: In a large mixing bowl, beat the softened butter until creamy. Gradually add the powdered sugar, one cup at a time, beating well after each addition. Add the milk and peppermint extract, and beat until light and fluffy. If desired, add a few drops of green food coloring to achieve a minty green color.
  7. Frost the Cupcakes: Once the cupcakes are completely cooled, frost them with the mint buttercream frosting using a piping bag or spatula.
  8. Decorate: Optionally, garnish the cupcakes with chocolate shavings or sprinkles for an extra touch of flavor and decoration.
  9. Serve and Enjoy: Serve the grasshopper cupcakes immediately, or store them in an airtight container in the refrigerator for up to three days. Enjoy these delightful treats with friends and family!

These grasshopper cupcakes are perfect for any occasion, whether it's a birthday party, holiday celebration, or simply a sweet treat for yourself. Enjoy the refreshing combination of mint and chocolate in every bite!

Chocolate Chip Cheesecake Cupcakes


Chocolate chip cheesecake cupcakes are a delightful treat that combines the creamy richness of cheesecake with the indulgent sweetness of chocolate chips. Here's a recipe to guide you through making them:

Ingredients:

For the Crust:
  • 1 and 1/2 cups of graham cracker crumbs
  • 1/4 cup of granulated sugar
  • 1/3 cup of unsalted butter, melted

For the Cheesecake Filling:
  • 16 oz (2 packages) of cream cheese, softened
  • 1/2 cup of granulated sugar
  • 2 large eggs, at room temperature
  • 1 teaspoon of vanilla extract
  • 1/2 cup of semi-sweet chocolate chips

For Topping:
  • Additional chocolate chips for sprinkling

Instructions:
1. Preheat the oven to 325°F (160°C). Line a muffin tin with cupcake liners and set aside.
2. Prepare the Crust:
  • In a mixing bowl, combine the graham cracker crumbs, sugar, and melted butter. Mix until well combined and the mixture resembles wet sand.
  • Press about 1 tablespoon of the crust mixture into the bottom of each cupcake liner. Use the back of a spoon or your fingers to press it down firmly.
  • Place the muffin tin in the refrigerator while you prepare the cheesecake filling.
3. Prepare the Cheesecake Filling:
  • In a large mixing bowl, beat the softened cream cheese and sugar together until smooth and creamy, about 2-3 minutes.
  • Add the eggs, one at a time, mixing well after each addition. Scrape down the sides of the bowl as needed.
  • Stir in the vanilla extract until well combined.
  • Gently fold in the chocolate chips until evenly distributed throughout the batter.
4. Fill the Cupcake Liners:
  • Remove the muffin tin from the refrigerator and evenly distribute the cheesecake filling among the cupcake liners, filling each about 2/3 full.
5. Bake:
  • Bake the cupcakes in the preheated oven for 20-25 minutes, or until the edges are set and the centers are slightly jiggly.
  • Remove from the oven and let them cool in the muffin tin for about 10 minutes, then transfer them to a wire rack to cool completely.
6. Chill:
  • Once cooled to room temperature, place the cupcakes in the refrigerator to chill for at least 2 hours, or until fully set.
7. Serve:
  • Before serving, sprinkle additional chocolate chips on top of each cupcake, if desired.
  • Enjoy your delicious chocolate chip cheesecake cupcakes!

These cupcakes are perfect for any occasion and are sure to impress your friends and family with their creamy texture and decadent flavor. Enjoy!

Mocha Cupcakes


Mocha cupcakes are a delightful treat for coffee and chocolate lovers alike. Here's a recipe for you:

Ingredients:

For the cupcakes:
  • 1 and 1/2 cups all-purpose flour
  • 1/2 cup unsweetened cocoa powder
  • 1 teaspoon baking powder
  • 1/2 teaspoon baking soda
  • 1/4 teaspoon salt
  • 1/2 cup unsalted butter, softened
  • 1 cup granulated sugar
  • 2 large eggs, at room temperature
  • 1 teaspoon vanilla extract
  • 1/2 cup buttermilk
  • 1/2 cup strong brewed coffee, cooled to room temperature

For the mocha frosting:
  • 1/2 cup unsalted butter, softened
  • 2 cups powdered sugar
  • 2 tablespoons unsweetened cocoa powder
  • 1 tablespoon instant coffee granules
  • 2-3 tablespoons heavy cream or milk
  • 1 teaspoon vanilla extract

Instructions:

  1. Preheat your oven to 350°F (175°C). Line a muffin tin with cupcake liners.
  2. In a medium-sized bowl, whisk together the flour, cocoa powder, baking powder, baking soda, and salt. Set aside.
  3. In a large mixing bowl, beat the softened butter and granulated sugar together until light and fluffy, about 2-3 minutes.
  4. Add the eggs, one at a time, mixing well after each addition. Stir in the vanilla extract.
  5. Alternate adding the dry ingredients and the buttermilk to the butter mixture, beginning and ending with the dry ingredients. Mix until just combined, being careful not to overmix.
  6. Slowly pour in the cooled brewed coffee and mix until just combined. The batter will be thin, but that's normal.
  7. Divide the batter evenly among the prepared cupcake liners, filling each about 2/3 full.
  8. Bake in the preheated oven for 18-20 minutes, or until a toothpick inserted into the center of a cupcake comes out clean.
  9. Remove the cupcakes from the oven and allow them to cool in the pan for a few minutes before transferring them to a wire rack to cool completely.
  10. While the cupcakes are cooling, prepare the mocha frosting. In a mixing bowl, beat the softened butter until smooth.
  11. Gradually add the powdered sugar, cocoa powder, and instant coffee granules, mixing until well combined.
  12. Add the vanilla extract and 2 tablespoons of heavy cream or milk, then beat the frosting until light and fluffy. If needed, add an additional tablespoon of heavy cream or milk to achieve the desired consistency.
  13. Once the cupcakes are completely cooled, frost them with the mocha frosting using a piping bag or offset spatula.
  14. Optionally, garnish the cupcakes with chocolate shavings, cocoa powder, or a drizzle of chocolate syrup.
  15. Serve and enjoy your delicious mocha cupcakes!

These cupcakes are perfect for any occasion, whether it's a special celebration or just a sweet indulgence. Enjoy!

Dark Chocolate Cream Cheese Frosted Cupcakes


Here's a recipe for delicious dark chocolate cream cheese frosted cupcakes:

Ingredients:

For the cupcakes:
  • 1 and 1/4 cups all-purpose flour
  • 1/2 cup unsweetened cocoa powder
  • 1 teaspoon baking powder
  • 1/2 teaspoon baking soda
  • 1/4 teaspoon salt
  • 1/2 cup unsalted butter, softened
  • 1 cup granulated sugar
  • 2 large eggs
  • 1 teaspoon vanilla extract
  • 1/2 cup sour cream
  • 1/2 cup hot water

For the dark chocolate cream cheese frosting:
  • 8 ounces cream cheese, softened
  • 1/4 cup unsalted butter, softened
  • 2 cups powdered sugar
  • 1/4 cup unsweetened cocoa powder
  • 1 teaspoon vanilla extract
  • 4 ounces dark chocolate, melted and cooled slightly

Instructions:

  1. Preheat your oven to 350°F (175°C). Line a muffin tin with cupcake liners.
  2. In a medium bowl, whisk together the flour, cocoa powder, baking powder, baking soda, and salt. Set aside.
  3. In a large mixing bowl, cream together the softened butter and granulated sugar until light and fluffy, about 2-3 minutes.
  4. Add the eggs, one at a time, beating well after each addition. Stir in the vanilla extract.
  5. Gradually add the dry ingredients to the wet ingredients, alternating with the sour cream, beginning and ending with the dry ingredients. Mix until just combined.
  6. Stir in the hot water until the batter is smooth. Be careful not to overmix.
  7. Divide the batter evenly among the prepared muffin cups, filling each about 2/3 full.
  8. Bake in the preheated oven for 18-20 minutes, or until a toothpick inserted into the center of a cupcake comes out clean.
  9. Remove the cupcakes from the oven and allow them to cool in the pan for 5 minutes before transferring them to a wire rack to cool completely.
  10. While the cupcakes are cooling, prepare the dark chocolate cream cheese frosting. In a large mixing bowl, beat together the softened cream cheese and butter until smooth and creamy.
  11. Gradually add the powdered sugar and cocoa powder, mixing until well combined and creamy. Stir in the vanilla extract.
  12. Finally, fold in the melted dark chocolate until fully incorporated.
  13. Once the cupcakes are completely cool, frost them with the dark chocolate cream cheese frosting using a piping bag or offset spatula.
  14. Optionally, garnish with chocolate shavings, cocoa powder, or any other decorations of your choice.
  15. Serve and enjoy these decadent dark chocolate cream cheese frosted cupcakes! They're perfect for any occasion or celebration.

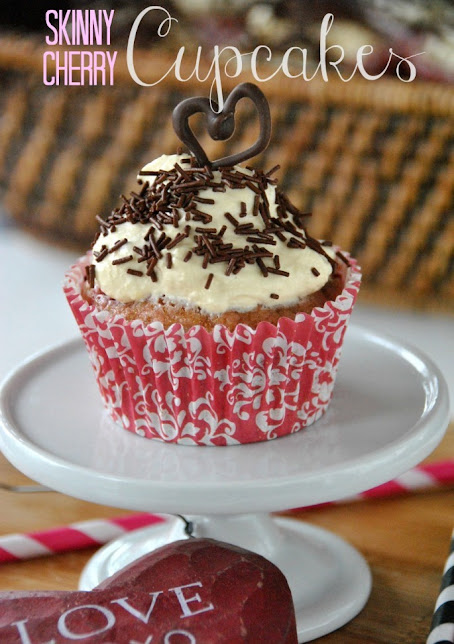
Skinny Cherry Cupcakes for Valentine’s Day


Here's a recipe for Skinny Cherry Cupcakes, perfect for Valentine's Day:

Ingredients:

For the cupcakes:
  • 1 cup whole wheat flour
  • 1/2 cup all-purpose flour
  • 1 teaspoon baking powder
  • 1/2 teaspoon baking soda
  • 1/4 teaspoon salt
  • 1/2 cup unsweetened applesauce
  • 1/4 cup honey or maple syrup
  • 1/4 cup unsweetened almond milk (or any milk of your choice)
  • 2 large eggs
  • 1 teaspoon vanilla extract
  • 1 cup pitted and chopped fresh cherries (or thawed frozen cherries)

For the frosting:
  • 8 oz low-fat cream cheese, softened
  • 1/4 cup powdered erythritol or powdered sugar substitute
  • 1/2 teaspoon vanilla extract
  • Additional cherries for garnish (optional)

Instructions:

  1. Preheat your oven to 350°F (175°C). Line a muffin tin with cupcake liners or lightly grease with cooking spray.
  2. In a large mixing bowl, whisk together the whole wheat flour, all-purpose flour, baking powder, baking soda, and salt.
  3. In another bowl, mix together the applesauce, honey (or maple syrup), almond milk, eggs, and vanilla extract until well combined.
  4. Gradually add the wet ingredients to the dry ingredients, stirring until just combined. Be careful not to overmix.
  5. Gently fold in the chopped cherries into the batter.
  6. Spoon the batter evenly into the prepared muffin tin, filling each cup about 2/3 full.
  7. Bake in the preheated oven for 18-20 minutes, or until a toothpick inserted into the center of a cupcake comes out clean.
  8. Allow the cupcakes to cool completely on a wire rack before frosting.
  9. While the cupcakes are cooling, prepare the frosting. In a mixing bowl, beat the softened cream cheese, powdered erythritol (or powdered sugar substitute), and vanilla extract until smooth and creamy.
  10. Once the cupcakes are completely cooled, spread or pipe the frosting onto each cupcake.
  11. Optional: Garnish each cupcake with a fresh cherry on top.
  12. Serve and enjoy your delicious Skinny Cherry Cupcakes with your loved ones for Valentine's Day!

These cupcakes are a lighter, healthier alternative to traditional cupcakes, making them perfect for indulging without guilt on this special occasion. Enjoy!

Mint Chocolate Chip Cupcakes


Here's a delicious recipe for mint chocolate chip cupcakes:

Ingredients:

For the cupcakes:
  • 1 1/2 cups all-purpose flour
  • 1 1/2 teaspoons baking powder
  • 1/4 teaspoon salt
  • 1/2 cup unsalted butter, softened
  • 1 cup granulated sugar
  • 2 large eggs, room temperature
  • 1 teaspoon vanilla extract
  • 1/2 teaspoon peppermint extract
  • 1/2 cup milk
  • 1/2 cup mini chocolate chips

For the frosting:
  • 1/2 cup unsalted butter, softened
  • 2 cups powdered sugar
  • 1-2 tablespoons milk
  • 1/2 teaspoon peppermint extract
  • Green food coloring (optional)
  • 1/2 cup mini chocolate chips, for topping

Instructions:

  1. Preheat your oven to 350°F (175°C). Line a muffin tin with cupcake liners.
  2. In a medium-sized bowl, whisk together the flour, baking powder, and salt. Set aside.
  3. In a large mixing bowl, cream together the softened butter and sugar until light and fluffy.
  4. Add the eggs, one at a time, mixing well after each addition. Then stir in the vanilla extract and peppermint extract.
  5. Gradually add the dry ingredients to the wet ingredients, alternating with the milk, starting and ending with the dry ingredients. Mix until just combined. Be careful not to overmix.
  6. Gently fold in the mini chocolate chips.
  7. Divide the batter evenly among the prepared cupcake liners, filling each about 2/3 full.
  8. Bake in the preheated oven for 18-20 minutes, or until a toothpick inserted into the center of a cupcake comes out clean.
  9. Allow the cupcakes to cool in the pan for a few minutes, then transfer them to a wire rack to cool completely before frosting.
  10. To make the frosting, beat the softened butter until creamy. Gradually add the powdered sugar, alternating with the milk, until the desired consistency is reached. Mix in the peppermint extract and green food coloring, if using.
  11. Once the cupcakes are completely cooled, pipe or spread the frosting onto each cupcake.
  12. Sprinkle mini chocolate chips on top of the frosting for decoration.
  13. Serve and enjoy your delicious mint chocolate chip cupcakes!

These cupcakes are perfect for any occasion, and the combination of refreshing mint and rich chocolate is sure to be a hit with everyone!